5 Simple Steps to Carve Ethiopian Opal Like a Pro
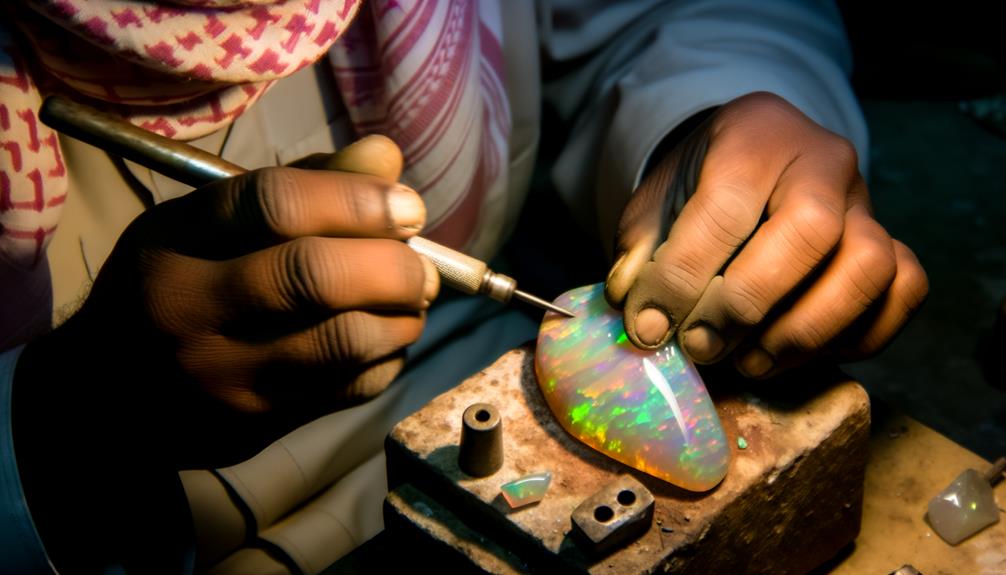
To carve Ethiopian Opal, start by understanding its hydrophane nature, which means it absorbs water and shows vivid colors. Use high-quality rotary tools with diamond-tipped burs and variable speed to avoid overheating.
Make sure your workspace is well-lit and organized, with a water drip system to cool the opal. Assess the opal carefully for color play and clarity, then sketch your design.
Carve incrementally, maintaining symmetry and depth. Sand with progressively finer grit sandpapers and polish using diamond abrasive pads and cerium oxide.
Proper techniques will highlight the opal's brilliance, revealing its full potential. There's much more to master in this process.

Key Takeaways
- Use diamond-tipped burs with rotary tools and variable speed settings to prevent overheating.
- Employ a water drip system to cool the opal and avoid cracking during carving.
- Examine and document the opal's color play, clarity, and inclusions before starting.
- Progress through coarse to fine-grit sandpapers, maintaining circular motions for even smoothing.
- Apply cerium oxide and diamond paste for the final polishing to enhance brilliance and color play.
Understanding Ethiopian Opal
Ethiopian Opal, known for its vibrant play-of-color, is a hydrophane variety that absorbs water, making it unique among opals. You'll find that its water absorption significantly impacts its appearance and carving process.
When dry, Ethiopian Opal may appear dull, but once hydrated, its colors become vividly apparent. This transformation occurs due to the microscopic structure that refracts light differently when hydrated.
Understanding this property is vital since the stone's hardness and brittleness vary with its moisture content. Hydrated Ethiopian Opal is slightly softer and more flexible, reducing the risk of fractures during carving. Conversely, a dry opal is more prone to cracking.
Recognizing these characteristics ensures you approach carving with the precision and care this delicate gemstone demands.
Selecting the Right Tools
Choosing the right tools is fundamental for ensuring precision and minimizing damage when carving Ethiopian Opal. Start with a high-quality rotary tool equipped with diamond-tipped burs; they offer excellent control and durability. Opt for a variable speed setting to adapt to the opal's hardness and prevent overheating.
Use fine-grit sandpapers to smooth edges and achieve a polished surface. Incorporate a water drip system to keep the opal cool and reduce dust. Handheld magnifying lenses will help you inspect details closely. Lastly, microfiber cloths are vital for safely cleaning the opal without scratching.
Each tool plays a specific role; their proper selection and usage are crucial to maintaining the integrity and beauty of the stone.
Preparing Your Workspace
To guarantee a safe and efficient carving process, start by organizing your workspace to accommodate both the tools and the opal. Secure you have adequate lighting to detect the opal's subtle features. Position a stable workbench at a comfortable height, and ensure a magnifying lamp for detailed inspection.
Arrange your tools—diamond-tipped drills, burrs, and polishing pads—within easy reach. Employ a dust extraction system to keep the area clean and reduce inhalation hazards. Place a water drip system near your workbench to cool the opal and minimize dust. Use a soft, lint-free cloth to frequently clean your workspace.
Assessing the Rough Opal
Evaluating the rough opal's quality involves examining its color play, clarity, and potential inclusions under a good light source.
You should start by observing the opal's color play, noting the range and intensity of colors.
Use a loupe or microscope to check for clarity; clear sections are more valuable.
Look for any inclusions or fractures, which can weaken the stone.
Rotate the opal to see how light interacts with its surface, identifying any areas of potential brilliance or dullness.
Examine the stone's thickness and shape to understand its structural integrity.
Document your observations meticulously, ensuring you have a thorough understanding of the opal's characteristics.
This detailed assessment aids in making informed decisions during the carving process.
Planning Your Design
When planning your design, start by visualizing the final piece, considering the opal's natural patterns and colors.
Sketch an initial outline to map out your ideas, ensuring you maximize the stone's unique features.
Use precise measurements and detailed annotations to guide your carving process.
Visualizing Final Piece
Crafting a mesmerizing Ethiopian opal masterpiece starts with meticulously planning your design, envisioning how the natural play of colors will enhance the final piece. Examine the opal under various light conditions to understand its color patterns and flashes. Identify the stone's unique features—such as fire, clarity, and inclusions—that will dictate the carving strategy.
Visualize the opal's potential by rotating it and considering its three-dimensional aspects. Decide which angles will best display its vibrant hues and luminosity. Determine the opal's orientation, ensuring the most enchanting color play is highlighted in the finished piece.
This detailed analysis provides a roadmap, allowing you to transform the raw gemstone into a breathtaking work of art, maximizing its inherent beauty.
Sketching Initial Outline
Begin by translating your envisioned design into a precise sketch, capturing the opal's contours and highlighting its most vibrant color zones. Utilize a fine-point pencil to delineate the shape, ensuring you account for the opal's natural irregularities.
Emphasize the areas where the play-of-color is most vivid, as these will become focal points in your final piece. Measure dimensions meticulously, noting key angles and curves. This detailed outline will serve as your roadmap, guiding each cut and polish.
Think analytically about the stone's structure, considering any inclusions or fractures that may affect your design. By planning thoroughly and sketching accurately, you'll maximize the opal's natural beauty and structural integrity, setting the stage for a successful carving process.
Initial Shaping Techniques
Start by selecting appropriate tools such as diamond-tipped burrs and fine-grit sandpaper to guarantee precision.
Next, create a rough outline of your design, carefully removing excess material while maintaining control.
Selecting Proper Tools
Choosing the correct tools for the initial shaping of Ethiopian opal is crucial to secure accuracy and avoid harm to this delicate gemstone. Start with diamond-tipped burrs, as they offer precision and minimize the risk of chipping.
Use a variable-speed rotary tool to maintain control over the shaping process. Opt for fine-grit sandpaper or diamond paste to gently smooth the surface without causing fractures.
Invest in a water drip system to keep the opal cool and reduce dust, which can obscure your view. Always wear protective eyewear and a dust mask for safety.
Rough Outline Process
Initiating the rough outline process involves meticulously marking the opal with a fine-tip marker to define the desired shape and dimensions. Position the opal under adequate lighting to guarantee the ink lines are clearly visible.
Use a diamond-tipped saw to carefully cut along the marked lines, maintaining steady hands to avoid any deviations. Employ a bench vise to stabilize the opal during cutting, reducing the risk of fractures.
After the initial cuts, use a coarse diamond file to refine the rough shape, focusing on removing excess material while preserving the integrity of the opal. Continuously inspect the opal from different angles, ensuring symmetry and alignment with the marked outline.
This methodical approach sets a strong foundation for subsequent carving stages.
Ensuring Optimal Thickness
To guarantee the ideal thickness of the opal, measure the dimensions meticulously using a digital caliper, aiming for uniformity throughout the stone. Begin by establishing a baseline thickness that accommodates both durability and clarity.
Next, use a coarse diamond wheel to remove excess material, maintaining consistent pressure to avoid uneven surfaces. Regularly check the thickness as you work, making incremental adjustments.
Follow these steps:
- Measure and Mark: Use a digital caliper to measure and mark the desired thickness at multiple points.
- Initial Shaping: Employ a coarse diamond wheel, maintaining steady pressure and frequent thickness checks.
- Refine and Smooth: Shift to finer grits for smoothing, continuously verifying uniform thickness with the caliper.
These steps secure a balanced, aesthetically pleasing opal carving.
Fine Carving Methods
When carving Ethiopian opal, precision tools like diamond-tipped burs and micro-motor systems guarantee meticulous detail and smooth finishes. Begin by securing the opal firmly to prevent any unintended movement.
Use diamond-tipped burs to outline and carve intricate patterns, guaranteeing you maintain a steady hand to avoid chipping. Micro-motor systems provide the speed control necessary for delicate work.
Work incrementally, checking your progress frequently to maintain symmetry and depth. Employ a variety of bur shapes and sizes to achieve different textures and contours.
Always verify your tools are clean and sharp to prevent any damage to the opal. Precision and patience are key—rushing the process can result in flaws that compromise the opal's beauty.
Sanding and Smoothing
After meticulously carving the Ethiopian opal, it's time to refine the piece through careful sanding and smoothing to achieve a flawless, polished finish. Begin with a coarse grit sandpaper (around 220-grit) to remove larger imperfections. Maintain consistent pressure and move in circular motions to evenly smooth the surface.
Next, shift to finer grits, such as 600 and 1200-grit, to further refine the opal:
- 220-grit: Eliminates major surface irregularities.
- 600-grit: Initiates the smoothing process, reducing scratch visibility.
- 1200-grit: Readies the opal for the final polish by delivering a near-smooth finish.
Throughout this process, periodically rinse the opal with water to remove debris, guaranteeing a clear view of your progress. This careful approach guarantees the opal's natural beauty is fully revealed.
Polishing to Perfection
Now it's time to enhance the opal's brilliance by choosing the right polishing tools, such as felt wheels and diamond paste.
You'll need to apply ideal polishing techniques, ensuring even pressure and consistent motion to achieve a mirror-like finish.
Choosing Polishing Tools
Selecting the right polishing tools is essential for achieving a flawless finish on Ethiopian opal. This process requires a meticulous choice of abrasives, polishing compounds, and equipment. You need to understand the specific requirements of this delicate gemstone to avoid damage and achieve the best results.
Here's what you need:
- Diamond Abrasive Pads: These offer precision and control, reducing the risk of chipping the opal.
- Cerium Oxide Polishing Compound: This compound provides the necessary fine-grit polish to bring out the opal's natural brilliance.
- Leather or Felt Polishing Wheels: These surfaces are gentle yet effective, ensuring a high-quality finish without scratching.
Optimal Polishing Techniques
To achieve a flawless sheen on Ethiopian opal, you must employ a systematic method that includes gradual advancement through finer grits and consistent application of polishing compounds.
Start by using a 600-grit diamond wheel to smooth the opal's surface. Progressively move to 1200-grit, making certain you eliminate all previous scratches. Move to 3000-grit for a finer finish.
Next, apply a cerium oxide or aluminum oxide polish with a felt or leather pad. Maintain steady pressure and use a slow, circular motion to avoid heat buildup, which can crack the opal.
Consistency is crucial; make sure each step thoroughly removes the marks from the previous grit. This meticulous process guarantees your Ethiopian opal achieves a mirror-like finish.
Final Finishing Touches
Achieving the ultimate shine on your Ethiopian opal involves meticulous attention to detail and the strategic use of high-quality polishing compounds. You'll start by using a cerium oxide paste to guarantee a smooth, reflective surface. Apply it with a felt wheel, maintaining consistent pressure to avoid over-polishing any areas.
Next, switch to a finer diamond paste for additional refinement. This step enhances the opal's inherent play of color.
Follow these steps:
- Cerium Oxide Application: Use a felt wheel to evenly apply the cerium oxide paste.
- Diamond Paste Polishing: Move to a finer diamond paste for enhanced brilliance.
- Final Buffing: Use a clean, soft cloth to buff the opal to perfection.
This method guarantees your opal achieves maximum brilliance and clarity.
Preserving Your Carved Opal
Securing the longevity of your carved Ethiopian opal involves meticulous care and specific preservation techniques.
First, store your opal in a stable, humidity-controlled environment to prevent dehydration, which can cause cracking.
Use a soft, lint-free cloth to clean it, avoiding harsh chemicals that could damage its delicate structure.
When handling the opal, wear gloves to prevent oil transfer from your skin.
If you need to display your opal, make sure it's away from direct sunlight to avoid color fading.
In addition, avoid exposing the opal to abrupt temperature changes, as thermal shock can cause fractures.
Conclusion
Carving Ethiopian opal is a rewarding craft that transforms raw beauty into exquisite art. You might worry about damaging the stone, but with the right techniques and tools, you'll minimize risks.
Remember to assess your opal, plan meticulously, and employ fine carving methods. Sanding, smoothing, and polishing will bring out the gem's brilliance. Preserve your masterpiece with proper care.
By following these steps, you'll create stunning opal pieces that captivate and inspire.


